Best home lower back exercises for back pain. Part 4, Advanced Core Exercises

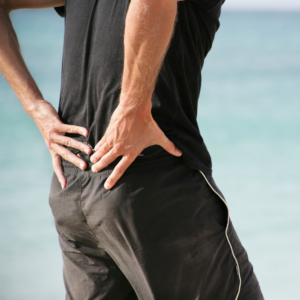
man with hands on lower back wearing a watch

Having a strong, healthy back is important if you play sports, work out, sit at a desk all day, care for small children, or are recovering from an injury. This is the fourth in our series of lower back exercise programs to take you from first having a back injury, disc injury, sciatica, or sprain/strain to becoming stronger and pain-free through progressively harder core exercise routines. 

Before beginning this program, you should have first mastered all of the intermediate core exercises in our previous routine and be close to having your back pain-free and stronger than it was when you first injured yourself.

Remember to go slow during this routine and gradually work up to 3 sets of 20-25 repetitions.  Once you can do three sets and 25 reps and you feel like the resistance is easy, you can increase the resistance and go through the progression again to make it more challenging. 

DOWNLOAD THE FREE EXERCISE PDF HERE

For this routine, you will need to use a cable weight system or resistance band attached to a wall and a balance pad to kneel on. 

CLICK HERE TO WATCH THESE EXERCISES DEMONSTRATED ON YOUTUBE

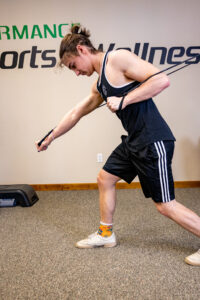
Standing Diagonal

Standing Diagonal exercise demonstrated by a young man


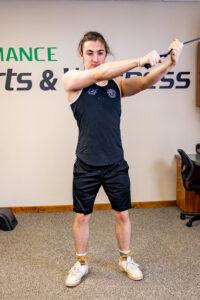
This exercise will challenge you to maintain your posture while pulling the band or cable across your body and down.  Go slow as you pull down, and then return to the starting position.  

Standing with the band over your shoulder with straight arms, pull the band down towards your feet. 


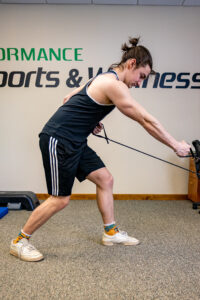
Chest Press Lunge Stance

Chest Press Lunge Stance demonstrated by a young male


Starting in a lunge stance and the cable/bands behind you squeeze your legs and butt, making your base strong as you push the hands forward while alternating sides.  Try to keep your base engaged as you move throughout this exercise.

Standing in a lunge stance with the band behind you and shoulder height alternate pushing one arm forward as you twist, keeping the lower body from moving. 


Incline Row Lunge Stance

incline row exercise demonstrated by a young male


This exercise uses the same setup as the chest press, except we are now alternately pulling up from low to high in a single arm row.  Remember to engage your leg and butt muscles to keep a strong base throughout the movement.

Standing in a lunge with the band low by your feet, alternate pulling 1 arm back as you pull the shoulder back, keeping the lower body from moving. 


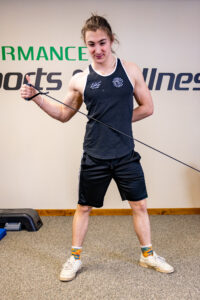
Lawn Mower

lawn mower exercise demonstrated by a young male


As the name suggests, this exercise uses the same movement you would have starting a lawn mower or other small engine.  Engage your lower body before you pull up and back with your upper body.

Standing with the band by your feet, pull the band back as you rotate your torso. 


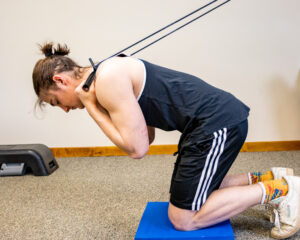
Kneeling Crunch Balance Pad

kneeling crunch on a balance pad demonstrated by a young male


Our final exercise in this routine challenges your abdominals as you do a kneeling crunch.  Keep your legs strong as you flex your upper body into the crunch position while holding the bands.

Kneeling on a balance pad or pillow and the band behind you overhead crunch forward toward the floor. 


I hope you liked this series of exercises designed to help you recover after a lower back injury or increase your core strength safely and gradually. 

To learn more, sign up for our newsletter, where we share useful tips and information like this! 

To download a pdf of this routine, click here.

If you’d like to get out of pain as quickly as possible, you can get an appointment with me by clicking the Request Appointment link on the right-hand side of your screen or calling (845) 255-1200.  I look forward to meeting you.


Best Exercises to relieve lower back pain at home, Part 3 Intermediate Exercises

Improve core strength with the Best home exercise program – Intermediate Core Exercises 

photo of a man with hands on his lower back appearing to be in pain

This is the third in our series of exercises you can do at home to recover from a lower back injury, relieve lower back pain, and improve lower back and core strength.  

In our first 2 blog posts, we explained the different types of lower back pain, injuries, and conditions that cause lower back pain and sciatica.  The exercises we will teach you today are the next step to relieving pain in your lower back and improving your core strength.  

Before starting these exercises, you should have completed our beginner series of lower back exercises and core floor exercises and should be able to do 25 reps and 3 sets of each exercise without pain. This is the starting point for people who just injured their lower back or want to strengthen their back from the ground up.  

When you can do these exercises proficiently, you will be on your way to living life pain-free and get back to doing things that currently hurt your lower back.

For these exercises, you will need a few pieces of equipment.

You will need an exercise ball, a set of exercise bands or tubing with a wall anchor, and a balance pad. If you want, you can substitute a chair for the ball and a blanket for the balance pad. 

As with any exercise program, if you are unsure about your health or ability to do these exercises, check with your physician.

As with our beginner exercise program, start with 2-3 sets of 10-12 repetitions with a band that you can manage and work up to 3 sets of 20-25 repetitions.  You can gradually increase the reps by 5 when the number of repetitions is no longer challenging.  If you can’t do 3 sets of any of the exercises, start with 1-2 sets.  Discontinue any exercise that causes increased pain.

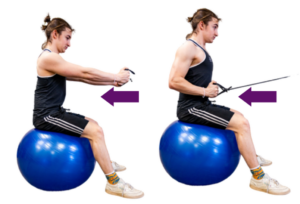
Ball seated row

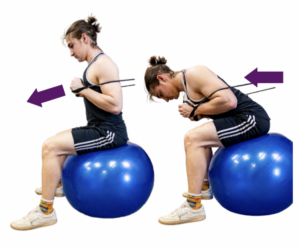
This exercise will increase the strength of your core and shoulder muscles.  It is done on a ball, and you need to attach the band with the band anchor wedged in a closed door, on a wall, or on a doorknob with the door closed.  When using a doorknob, loop the band on the doorknob outside the room you are working in, and close the door so the door can’t open, and the band is set.  Position the ball about 2-3 feet from where the band is attached and sit up on the ball with good posture. Then pull the bands back while squeezing the muscles between the shoulders.

ball seated row demonstration photos

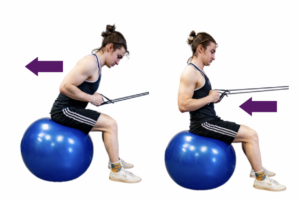
Ball back extension

This exercise will increase the strength of your lower back extensors and core.  Using the same band set up as the ball seated row, sit on the ball and bend forward slightly and pull the bands in as you did in the seated row. Then while keeping your elbows in, extend your body away from the band anchor.  Keep your elbows during the whole set as you go backward and return to the starting position.

ball back extension demonstration


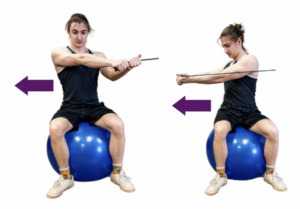
Ball seated rotation

This exercise will increase the strength of the muscles that rotate your spine and core.  Fix a band on an anchor as in the other exercises and sit on the ball facing sideways.  You can grip the bands together like you would with a baseball bat.  Sit up on the ball with good posture and twist as you pull the band across your body with straight arms.  Control the motion as you return to the starting position. 

ball seated rotation demonstration

Ball Crunch

This exercise will increase the strength in your core, abdominals, and hip flexors. Sit on the ball as you did in the back extension exercise but facing in the opposite direction.  Pull the bands to your chest in the front to tension the bands and keep them there as you flex your body forward. Slowly control the movement as you come back to the starting position.

ball crunch demonstration

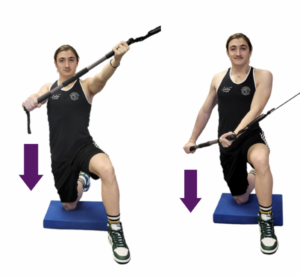
Half kneeling chop

This exercise will increase the strength in your core as you challenge yourself to maintain the starting position while pulling down and across your body like chopping wood.  You will need a stick or dowel to attach to the end of your band and attach the band slightly above shoulder height.  This exercise works best with tubing and the door anchor.  Start in a half kneeling position and hold the stick or dowel. The band or tubing should be anchored to a door. You can set yourself up with the band to your side or slightly behind you. You should be pulling towards the knee that is down on the ground.  As you pull the band across your body, extend the push with the top hand until it is straight.

half kneeling chop demonstration

Do you prefer a video demonstration of these exercises? Click here to access videos and printable demonstrations.

Once you’ve mastered these exercises, you’ll be on your way to having a stronger back and less back pain.  

When you can easily perform these exercises for 3 sets, you’re ready for the next level of core exercises found here. 

To learn more, sign up for our newsletter, where we share useful tips and information like this!

To download a pdf of this routine, click here.

If you’d like to get out of pain as quickly as possible, you can get an appointment with me by clicking the Request Appointment link on the right-hand side of your screen, or calling (845) 255-1200.  I look forward to meeting you.



Affiliate Links to Recommended Products:

Exercise tubing with handles and door anchor 2-20 lbs  – https://amzn.to/3Ew1Cfr

Exercise tubing with handles and door anchor 10-50 bs – https://amzn.to/3sMqBUiZ 

Balance pad – https://amzn.to/3LrBVwJ 

Physioball – https://amzn.to/3CpKHbZ

To see additional recommended items, please visit this link.

To read about other recommended exercises to improve core strength, visit my blog.

Best Exercises to relieve lower back pain at home, Part 2 Core Floor Exercises

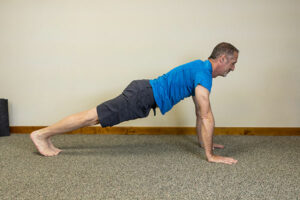
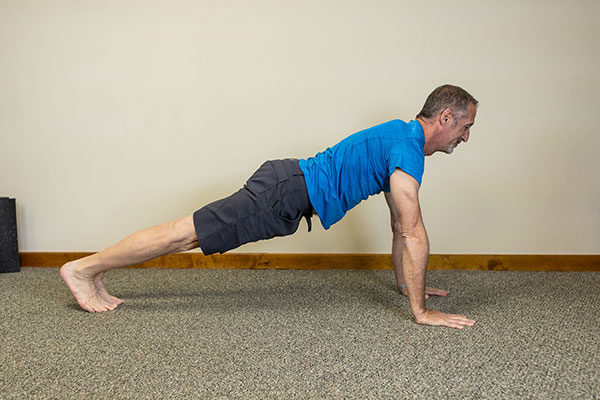
Plank demonstrated by dr. david ness

This is the second in our series of exercises that you can do at home to recover from a lower back injury, relieve lower back pain, and improve your lower back and core strength.

In our first blog post, we explained the different types of lower back pain, injuries, and conditions that cause lower back pain and sciatica.  The exercises we will teach you today are the next step to relieving pain in your lower back and improving your core strength.

Before starting these exercises, you should have completed our beginner series of lower back exercises. You should be able to do 25 reps and 3 sets of each exercise without pain. This is the starting point for people who just injured their lower back or want to strengthen their back from the ground up.

When you can do these exercises proficiently, you will be on your way to living life pain-free and get back to doing things that currently hurt your lower back.

As with any exercise program, if you are unsure about your health or ability to do these exercises, check with your physician.

These exercises increase your core strength by requiring you to hold the positions for time.  Start with 30 seconds and try to do 1-5 reps. As you get stronger, you can increase the hold times to 1-2 minutes and work up to 5 sets.

Try to use diaphragmatic breathing during these exercises. The diaphragm is a muscle and part of your core.  Start by breathing in through the nose for a 4 count, then exhaling through the nose for the same 4 count while you hold the position. Breathing this way will help you strengthen and connect to your diaphragm. Discontinue any exercise that causes increased pain.

Click HERE to watch Dr. Ness demonstrate these exercises on YouTube.

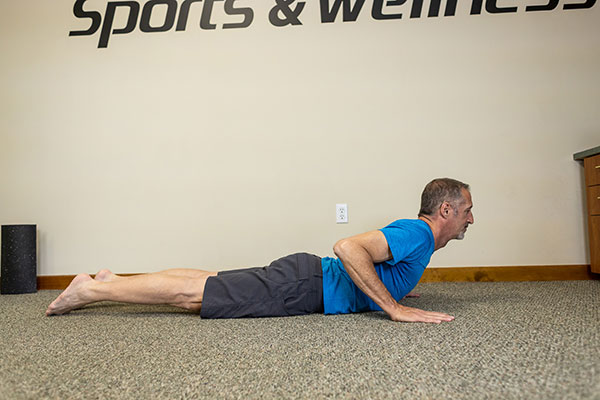
Cobra

Cobra

Start by lying on your stomach with your palms facing the floor and elbows bent by your side. Raise up your head and then trunk incrementally. Allow your arms to assist in lifting as needed. Hold this position for 30-60 seconds, then lower back down and repeat 1-5 times.

Slow, deep Diaphragmatic breathing the entire time.

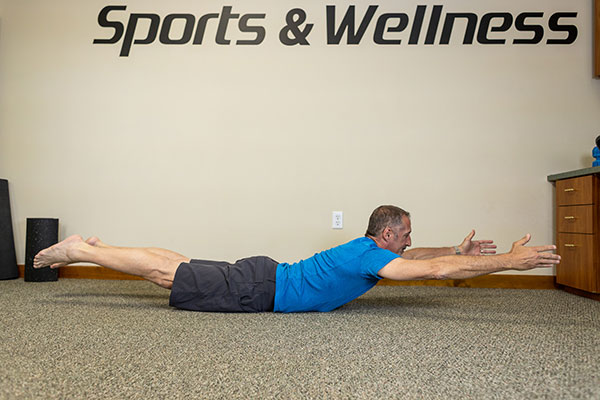
Superman

Superman

Start in the prone position with arms stretched above your head. Lift both legs and arms from the mat, keeping the pelvis in contact with the floor. Hold for 30-60 seconds maintaining arm and leg lift. Repeat 1-5 times, Diaphragmatic breathing

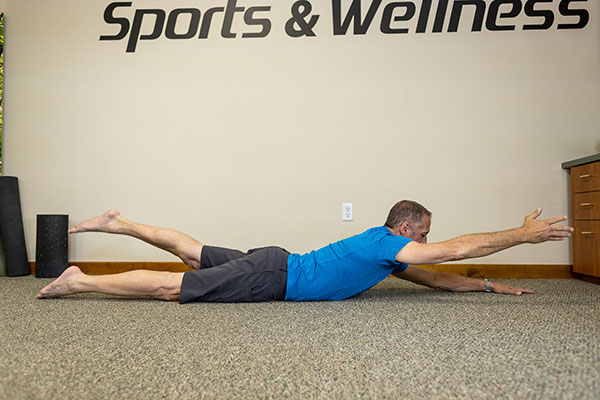
Variation

Superman Variation

Start in the superman position and lift the opposite arm and leg from the floor.  Alternate opposite arm and leg lift for 30-60 seconds. Repeat 1-5 times. Diaphragmatic breathing

Planks

Planks

Start with your elbows in and hands flat on the floor with your toes tucked and push up into the plank position. Try to keep your core tight with a neutral pelvic tilt as you keep your head, shoulders, and hips in the same straight alignment.  Hold for 30-60 seconds using diaphragmatic breathing. Repeat 1-5 times.

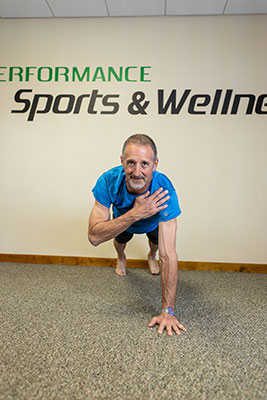
Shoulder Touches Variation

Shoulder Touches Variation

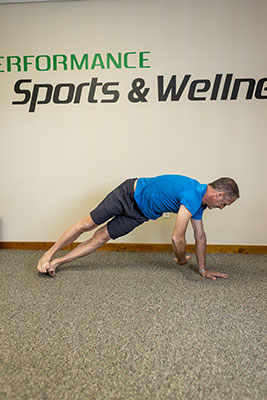
Begin in the plank position with wrists under shoulders and feet hip-width apart.  Touch your left shoulder with your right hand and return to the plank position. Alternate and repeat on the opposite side.  Do this for 30-60 seconds in control with diaphragmatic breathing. Repeat 1-5 times.

Forearm Plank Variation

Forearm Plank Variation

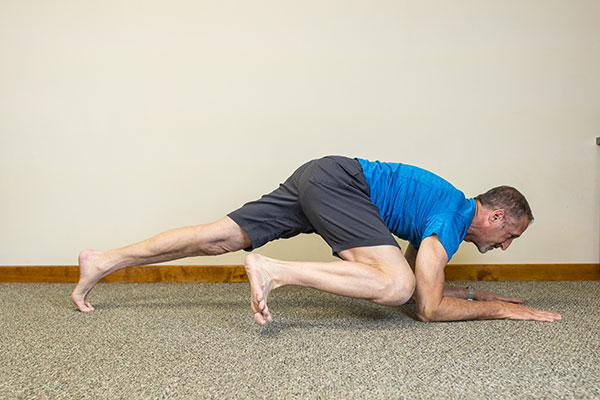
While lying face down, lift your body up on your forearms and toes. Try and maintain a straight spine. Bring your knee to your elbow. Alternate and repeat on the opposite side. Do not allow your hips or pelvis on either side to drop. Do this for 30-60 seconds in control with diaphragmatic breathing. Repeat 1-5 times.

Side Plank

Side Plank

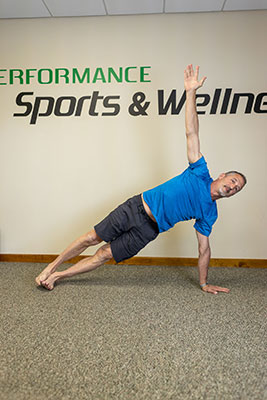
To do the side plank, you must maintain hip/knee/shoulder alignment (everything on a straight plane) as you come up into a side plank, lifting your top arm towards the ceiling.  Do this for 30-60 seconds in control with diaphragmatic breathing. Repeat 1-5 times.

Your bottom arm can be bent on the forearm, or with a straight arm (shown). If 2 straight legs are too difficult, you can bend the bottom knee and keep it on the ground to support yourself that way!

Variation 1 – Torso rotation

Variation 1 – Torso rotation

Start in the side plank and then take that top arm and slowly bring it around your body and under your chest and lift it back up. Do this for 30-60 seconds in control with diaphragmatic breathing. Repeat 1-5 times.

Variation 2 – Leg lift

Variation 2 – Leg lift

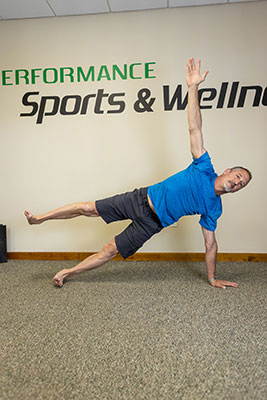
Maintain hip/knee/shoulder alignment (everything on a straight plane) as you come up into a side plank, lifting your top arm towards the ceiling. Then slowly raise your top leg until it is horizontal to the floor. Hold this position for 30-60 seconds in control with diaphragmatic breathing. Repeat 1-5 times.


To learn more, sign up for our newsletter, where we share useful tips and information like this! 

To download a pdf of this routine, click here.

If you’d like to get out of pain as quickly as possible, you can get an appointment with me by clicking the Request Appointment link on the right-hand side of your screen, or calling (845) 255-1200.  I look forward to meeting you.
Dry Needling now available at Performance Sports & Wellness

William Weinstein, L.Ac., Licensed Acupuncturist (located at Performance Sports and Wellness with Dr. David Ness), is now certified in Integrative Systemic Dry Needling for Sports Injuries and Trauma Rehabilitation by the American Dry Needling Institute. Dr. Yun-tao Ma, institute director, is an internationally respected expert in the field, teaching in Europe and China as well as the U.S. Dry needling is currently a sought-after treatment modality in use by professional and Olympic athletes around the world. See www.weinsteinacu.com for more information or call 845-255-2070. Find information about dry needling at http://dryneedlingcourse.com/.

Gift ideas from Dr. Ness

This year give the gift of self Myofascial release with a Foam Roller.  Foam rollers make great gifts for runners and other athletes.  We also offer Titleist Golf Fitness exams gift certificates.  Dr. Ness is certified by the Titleist Performance Institute.  The golf fitness exam can help identify musculoskeletal imbalances that lead to golf swing faults.  Our package comes with the exam, swing video, 2 training sessions, and online exercise program from the Titleist Performance Institute.

Consequences of an unsupported flat foot

As someone who takes care of a wide variety of athletes, I get to see a lot of people who participate in various sports come in with many types of repetitive or sometimes traumatic injuries of the lower extremities.  One of the most common causes of repetitive strain injuries to the lower extremities is people who are pronated or flatfooted.  If you are a pronator and you know it, and you do not use arch supports in your sneakers when you run.  You open your self up to a wide variety of injuries as a result of the altered biomechanics of the foot.  Just a few of the possible consequences that can be a result of running without the proper support are; shin splints, plantar fascitis, knee pain, ITB pain, hip pain, and lower back pain.  These areas can become injured or over strained due to the compensations that happen posturally above the foot to make up for the altered biomechanics from the foot.  Over time arthritis of the bones of the foot and toes, and other deformities of the foot like bunions, and hammertoes often accompany an uncorrected or unsupported pronated foot.


The risk of a Triathlete suffering any of the above is not uncommon during a season or career.  If you are a person who chronically suffers from plantar fascitis, shin splints, runners knee, ITB syndrome, or any other lower extremity or back injury the sooner you get into the right store bought support or custom made arch support the sooner those chronic aches and pains may go away.  Lower extremity aches and pains that do not go away with conservative treatment like orthotics, foam rolling, massage, or physical therapy could be a sign of adhesion and scar tissue build up in the muscles above the foot.  This is due to the long-standing altered biomechanics in the foot; in addition to the rigorous and repetitive training that triathlete’s endure.


One of the worst consequences of an unsupported flatfoot deformity in someone who is active is a stress fracture.  Stress fractures can occur in any of the bones of the foot, ankle, or leg.  As I sit here writing this article I have a cam walker boot on my foot due to a stress fracture of my Navicular bone in my foot.  I will have to wear this for 4-6 weeks while my bone heals.  I didn’t get this running, but rather twisted my ankle while in sneakers that didn’t have the proper support, and I have a very flat foot.  Initial x-rays did not show a fracture so I wasn’t put in a boot, just an air cast.  After 2 weeks I felt better and stopped using the brace.  After 2 long days on my feet with no brace (including HVTC race #1) I couldn’t walk again and went back to the podiatrist.  An MRI was ordered and low and behold I had a stress fracture, and a torn ligament in the bottom of my foot. I tore the calcaneal – navicular ligament (spring ligament), which will make my flat foot even worse, and being in custom orthotics even more important.


So the moral of the story is if you are a pronator and want to be the most biomechanically invincible Triathlete, get in the proper support and footwear fast. Then watch those aches and pains go away, as well as your times going down.


—————–
Dr. David Ness is a certified sports chiropractor practicing in New Paltz, N.Y.  Dr. Ness is the official chiropractor and Active Release Techniques provider for the Vassar College Athletic Dept.  Dr. Ness  has worked at the Lake Placid Ironman event as part of the ART treatment team since 2004.  Dr. Ness has been the ART provider for the Hudson Valley Tri Club since 2005 years providing free ART care after club races.  Dr. Ness also provides treatment at NYTC races around the NY metro area, and continues to work as part of the SOS Triathlon post-race care team, and at American Zofingen Ultra Duathlon.

Lower Back Pain & the Triathlete

Triathlon training and racing takes its toll on the lower back.  Long hours on the bike, the pounding of the road when running. Throw into the mix on top of your training are work, and everyday life that adds on the stress and strain to the lower back and spine.

Statistics show that between 60-80% of all North Americans will suffer from lower back pain at some point in their lives.  With the number of people in the workforce in sedentary jobs where sitting is the primary posture (and we don’t use good posture when we sit), spinal muscles weaken due to lack of endurance and strength, and a failure of these muscles to maintain good posture when sitting occurs.  Over time, this puts more pressure on our spinal discs, which can cause premature degeneration of the spinal disc, and bones of the spine.  This is commonly called Osteoarthritis of the spine and results in a weakness of the core ligaments, spinal discs, and muscles of the spine, and pain.  Other consequences of sitting long hours at work or driving without frequent breaks to stretch our legs and back are tight hamstrings, calves, and tight hip flexor (Psoas) Muscles.   Other repetitive types of jobs where frequent bending, lifting, twisting are required, also cause tremendous stress on our bodies and spine and can also result in damage to our muscles, and spinal discs.  More severe disc injuries where there is swelling (bulging) of the disc, or leakage of the disc material outside of the discs (herniation) can really hamper training when symptomatic.  If you have a bulging or herniated disc the swollen disc puts pressure on the spinal nerves and can cause severe pain in the lower back and leg causing sciatica.  Some disc herniations can be so debilitating that surgery may be required to relieve the pressure on the spinal cord or nerves.

So what can you do to prevent back pain and a disc injury?  The answer simple but it requires a constant effort.  If you are in a job that requires a lot of sitting or driving, get up frequently (2 times per hour).  Stretch your hamstrings, back, and hip flexors holding each stretch for 10 seconds. Do this all day long if you can.  This will prevent further tightening of the muscles of your back, and legs.  Also, stretching prior to physical activity is recommended for 5 minutes after a brief warm up.  Exercises that strengthen your core and spine, and build endurance in these muscles can be yoga or Pilates based in addition to traditional back and abdominal workouts.  Just doing sit ups do not strengthen your core.  Prone back extensions, hip extension, superman lifts all train the backside of the body.  Abdominal workouts should focus on strengthening the oblique and transverse abdominal muscles in addition to the 6-pack rectus abdominus muscle.

How do you recognize when you have a more serious back problem versus muscular pain from a hard or long work out?  Pain that doesn’t go away within in a few days could be the sign of a more serious muscular injury, osteoarthritis, or a disc injury.  Pain that shoots down the leg from the lower back or hip is sciatica.

What else can be done to heal an injured back or prevent a back injury?  Getting the proper medical attention as soon as possible can save you a lot of training time lost down the road.  Massage therapy, chiropractic, physical therapy, and acupuncture, can help heal injured areas better than doing nothing and hoping it goes away.  If you have tried a home care program that has included stretching, strengthening, and rolling on a ball or foam roller, and still are not getting better seek out some form of treatment.  Ignoring the pain and running or biking with pain can cause the body to accommodate for pain or weakness. If you train too long with an injury you may end up injuring some other part of you that is compensating for your injury.  Then you have two injuries to deal with not one!


—————–
Dr. David Ness is a certified sports chiropractor practicing in New Paltz, N.Y.  Dr. Ness is the official chiropractor and Active Release Techniques provider for the Vassar College Athletic Dept.  Dr. Ness  has worked at the Lake Placid Ironman event as part of the ART treatment team since 2004.  Dr. Ness has been the ART provider for the Hudson Valley Tri Club since 2005 years providing free ART care after club races.  Dr. Ness also provides treatment at NYTC races around the NY metro area, and continues to work as part of the SOS Triathlon post-race care team, and at American Zofingen Ultra Duathlon.

Muscle of the Month – Iliopsoas Muscle

For those of you that enjoyed last month’s featured muscle, we have the latest installment of Muscle of the Month.

The Iliopsoas muscle is often overlooked in training and in the treatment of lower back pain. In this addition of the muscle of the month we will look at ways to tell if you have a weak or shortened Iliopsoas muscle, and ways to stretch and strengthen your Iliopsoas muscle. We will also look at injuries to the psoas and their effect on the lower back and core.

The Iliopsoas muscle is actually broken into 3 muscles, the Psoas major, Psoas minor, and the Iliacus muscle. The Psoas major originates from the lumbar vertebra, lumbar discs, and transverse processes and inserts into the lesser trochanter of the Femur. The Iliacus muscle originates from the anterior fossa of the Ilium and joins with the Psoas major to form a common tendon that inserts into the lesser trochanter of the femur. Both muscles go under the inguinal ligament before inserting into the lesser trochanter of the Femur.

These muscles function with the other hip flexor muscles to flex the hip when your trunk / spine are fixed, or to flex the trunk / spine when the legs are fixed. In other words, the Iliopsoas either raises your thigh to your body, or bends your body towards your thighs.

The Iliopsoas muscle is very important in maintaining the proper lumbar lordotic curvature, and pelvic tilt in all activities. People who are in sedentary jobs, or sit or drive for long hours are prone to shortened hip flexors. Long hours training on a bicycle can also contribute to a tight Iliopsoas. If you have a shortened Iliopsoas muscle your pelvis tilts anterior, which will cause your lumbar curve to increase thus altering your spine and pelvic biomechanics. Running with this over time will increase the wear and tear on your lumbar intervertebral discs, and sacroiliac joints leading to lower back and sacroiliac pain.

To test yourself for tight Iliopsoas you have to lie on a bed or bench and take one knee into your chest. Then try to lower your opposite leg and knee off of the side of the bed. If your knee stays above or does not touch the bed you have a tight Iliopsoas muscle.

To stretch the Iliopsoas lunges with a foot on a chair and bend into the knee on the chair. This opens and stretches the opposite hip flexor. This can also be done with a knee on the floor and leaning into the bent knee opening and stretching the opposite side. For an additional stretch you can lift the arm on the side opposite of the bent knee and side bend to the side of your bent knee.

There are many ways to strengthen your Iliopsoas you can do your favorite abdominal exercises like crunches. One legged standing balance work is good for creating strength and stability in the core muscles. Dead bug exercises, (lying on your back and moving the arms and legs like a dead bug) strengthens the abdominals and Iliopsoas. 3 sets of 30 seconds or 1 minute of the dead bugs will get you in shape with a 30 second rest in between sets. Planks and bridges also will help strengthen the Iliopsoas and abdominals creating a solid core.

—————–
Dr. David Ness is a certified sports chiropractor practicing in New Paltz, N.Y.  Dr. Ness is the official chiropractor and Active Release Techniques provider for the Vassar College Athletic Dept.  Dr. Ness  has worked at the Lake Placid Ironman event as part of the ART treatment team since 2004.  Dr. Ness has been the ART provider for the Hudson Valley Tri Club since 2005 years providing free ART care after club races.  Dr. Ness also provides treatment at NYTC races around the NY metro area, and continues to work as part of the SOS Triathlon post-race care team, and at American Zofingen Ultra Duathlon.

Bad posture alters children’s throwing bio-mechanics causing injury.

I saw another rotator cuff injury in my office recently where the childs’s slumping posture caused a bio-mechanics imbalance in the shoulder and caused an injury from the demands of pitching.  Children who have a slumping posture develope imbalances in the muscles that stabilize the scapula, rotator cuff, and spine.  This causes a decrease in the space that the rotator cuff tendons have to move in resulting in impingement.  Over time with repetitive motions and  overuse the muscles and tendons can develop micro tears causing pain, decreased range of motion, and weakness.  If a child is having continued shoulder pain and it is not recognized soon the continued use or overuse causes can cause a larger tear or other damage to the shoulder, elbow, and spine.   It is not uncommon seeing college,  high school, and even middle school athletes having shoulder and elbow injuries due to overuse, and altered biomechanics associated with bad posture.   The shame of it all is that a lot of these injuries and surgeries could be avoided and corrected if they were identified early by a sports medical professional.  Chiropractic care, Physical Therapy,  Active Release techniques, and corrective exercises can correct posture.  If your child enjoys sports but are not listening to you when you tell them to sit up straight explain to them why.   If they have the potential to use sports to get the into college or beyond explain it to them that not sitting up straight will do more than give them bad posture.  It can cause them to have pain and get injured.  Some of the injuries kids are getting can be career ending injuries and result in surgery dashing the hopes and dreams of  children and parents alike.  Dr. David Ness

Dr. David Ness is a certified sports chiropractor practicing in New Paltz and Poughkeepsie.  Dr. Ness is the official chiropractor and Active Release Techniques provider for the Vassar College Athletic Dept since 2010, and the Hudson Valley Triathlon Club since 2005.

Muscle of the Month – Multifidus Muscles

It’s June 1st, time for Muscle of the Month.

The multifidus muscles are groups of muscles that are deep and are attached to the spine. They attach from your tailbone (sacrum) at every spinal level all the way up to the top of your neck, and span 3 spinal segments per muscle. These thin muscles are mostly responsible for maintaining posture and alignment in all activities, and are considered part of the back core muscles along with the erector spinae muscles. These muscles work in concert with the other core muscles; the deep abdominal muscles, pelvic floor muscles, hip muscles, and diaphragm. Training these muscles specifically can be done with Pilate’s, Yoga, Egoscue Technique, and other methods including physio balls or stability training devices like Bosu Balls.

Continue reading