Best Exercises to relieve lower back pain at home, Part 3 Intermediate Exercises

Improve core strength with the Best home exercise program – Intermediate Core Exercises 

photo of a man with hands on his lower back appearing to be in pain

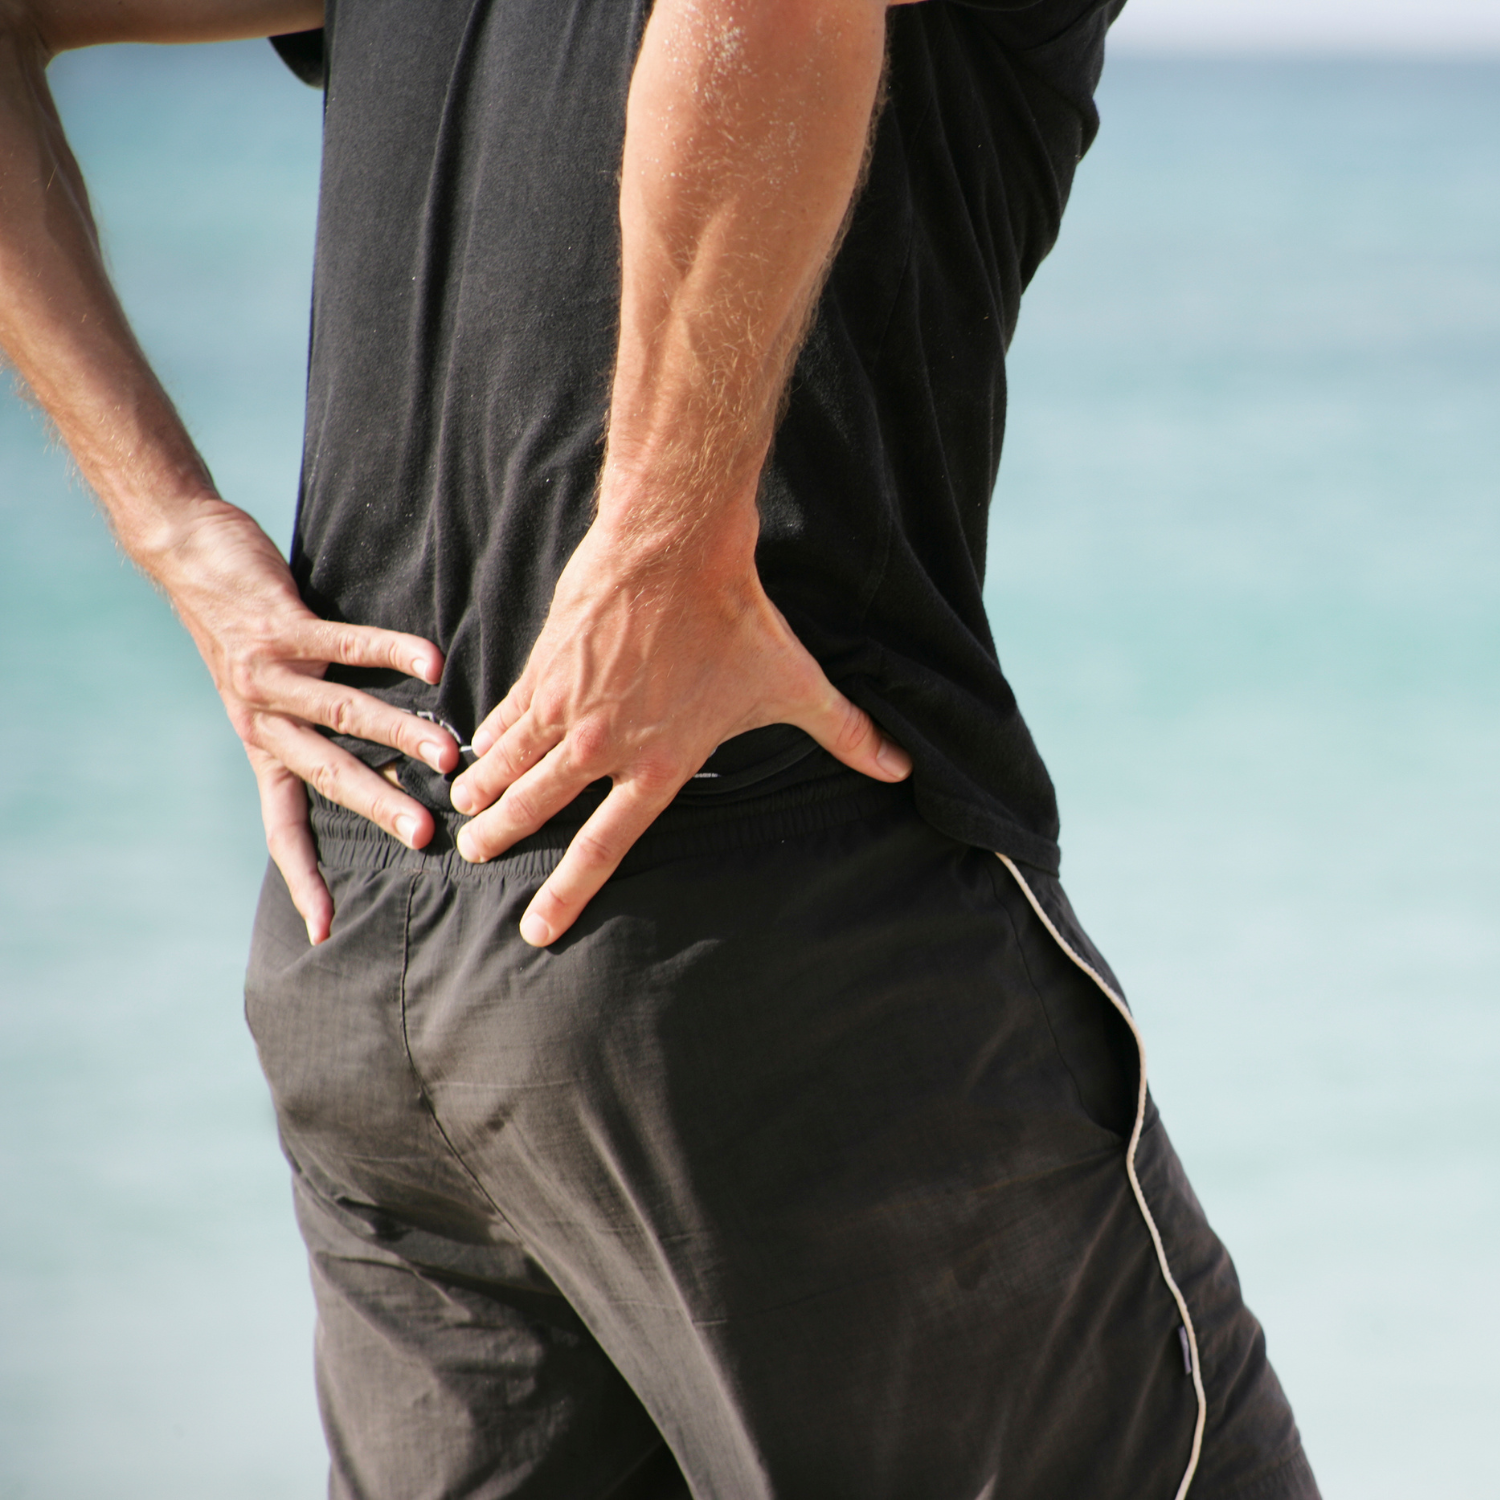
This is the third in our series of exercises you can do at home to recover from a lower back injury, relieve lower back pain, and improve lower back and core strength.  

In our first 2 blog posts, we explained the different types of lower back pain, injuries, and conditions that cause lower back pain and sciatica.  The exercises we will teach you today are the next step to relieving pain in your lower back and improving your core strength.  

Before starting these exercises, you should have completed our beginner series of lower back exercises and core floor exercises and should be able to do 25 reps and 3 sets of each exercise without pain. This is the starting point for people who just injured their lower back or want to strengthen their back from the ground up.  

When you can do these exercises proficiently, you will be on your way to living life pain-free and get back to doing things that currently hurt your lower back.

For these exercises, you will need a few pieces of equipment.

You will need an exercise ball, a set of exercise bands or tubing with a wall anchor, and a balance pad. If you want, you can substitute a chair for the ball and a blanket for the balance pad. 

As with any exercise program, if you are unsure about your health or ability to do these exercises, check with your physician.

As with our beginner exercise program, start with 2-3 sets of 10-12 repetitions with a band that you can manage and work up to 3 sets of 20-25 repetitions.  You can gradually increase the reps by 5 when the number of repetitions is no longer challenging.  If you can’t do 3 sets of any of the exercises, start with 1-2 sets.  Discontinue any exercise that causes increased pain.
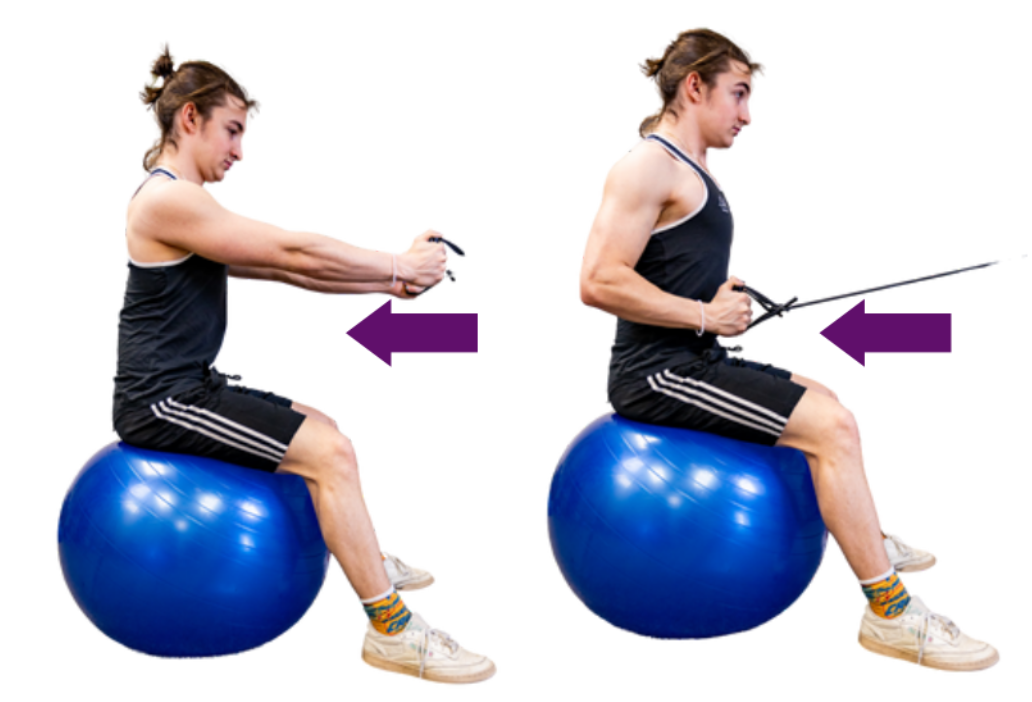
Ball seated row

This exercise will increase the strength of your core and shoulder muscles.  It is done on a ball, and you need to attach the band with the band anchor wedged in a closed door, on a wall, or on a doorknob with the door closed.  When using a doorknob, loop the band on the doorknob outside the room you are working in, and close the door so the door can’t open, and the band is set.  Position the ball about 2-3 feet from where the band is attached and sit up on the ball with good posture. Then pull the bands back while squeezing the muscles between the shoulders.
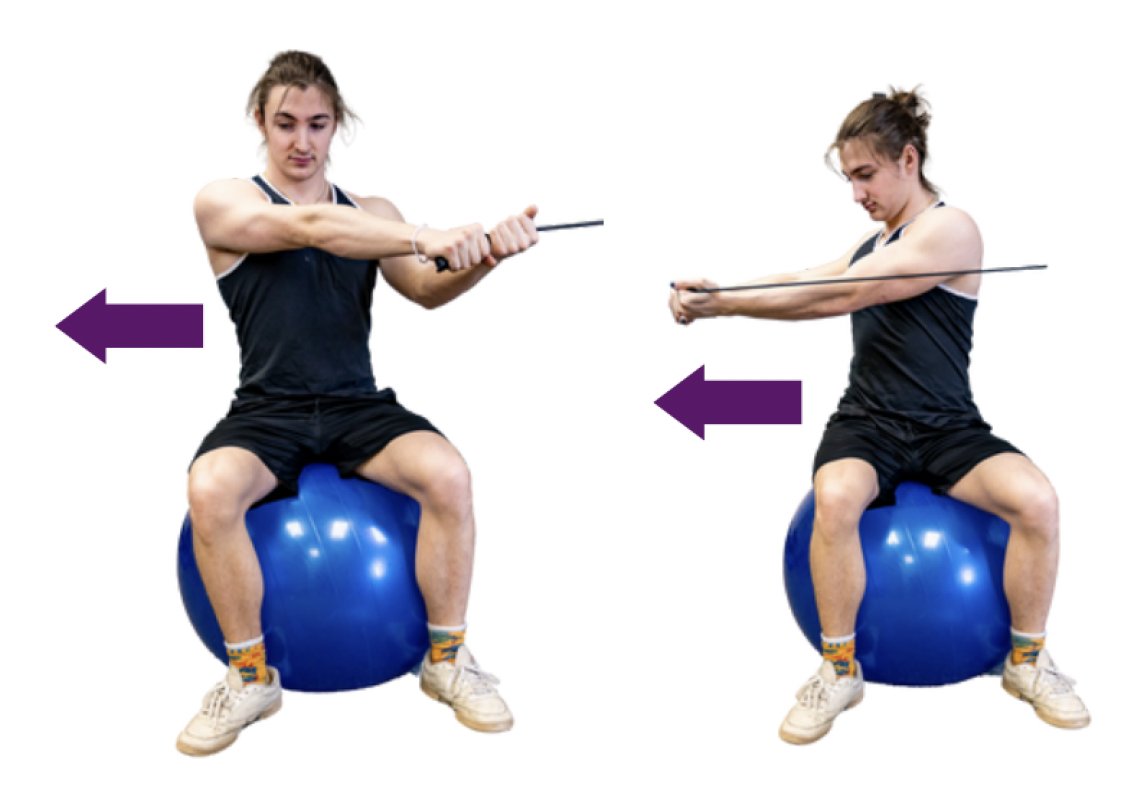
ball seated row demonstration photos

Ball back extension

This exercise will increase the strength of your lower back extensors and core.  Using the same band set up as the ball seated row, sit on the ball and bend forward slightly and pull the bands in as you did in the seated row. Then while keeping your elbows in, extend your body away from the band anchor.  Keep your elbows during the whole set as you go backward and return to the starting position.

ball back extension demonstration


Ball seated rotation

This exercise will increase the strength of the muscles that rotate your spine and core.  Fix a band on an anchor as in the other exercises and sit on the ball facing sideways.  You can grip the bands together like you would with a baseball bat.  Sit up on the ball with good posture and twist as you pull the band across your body with straight arms.  Control the motion as you return to the starting position. 
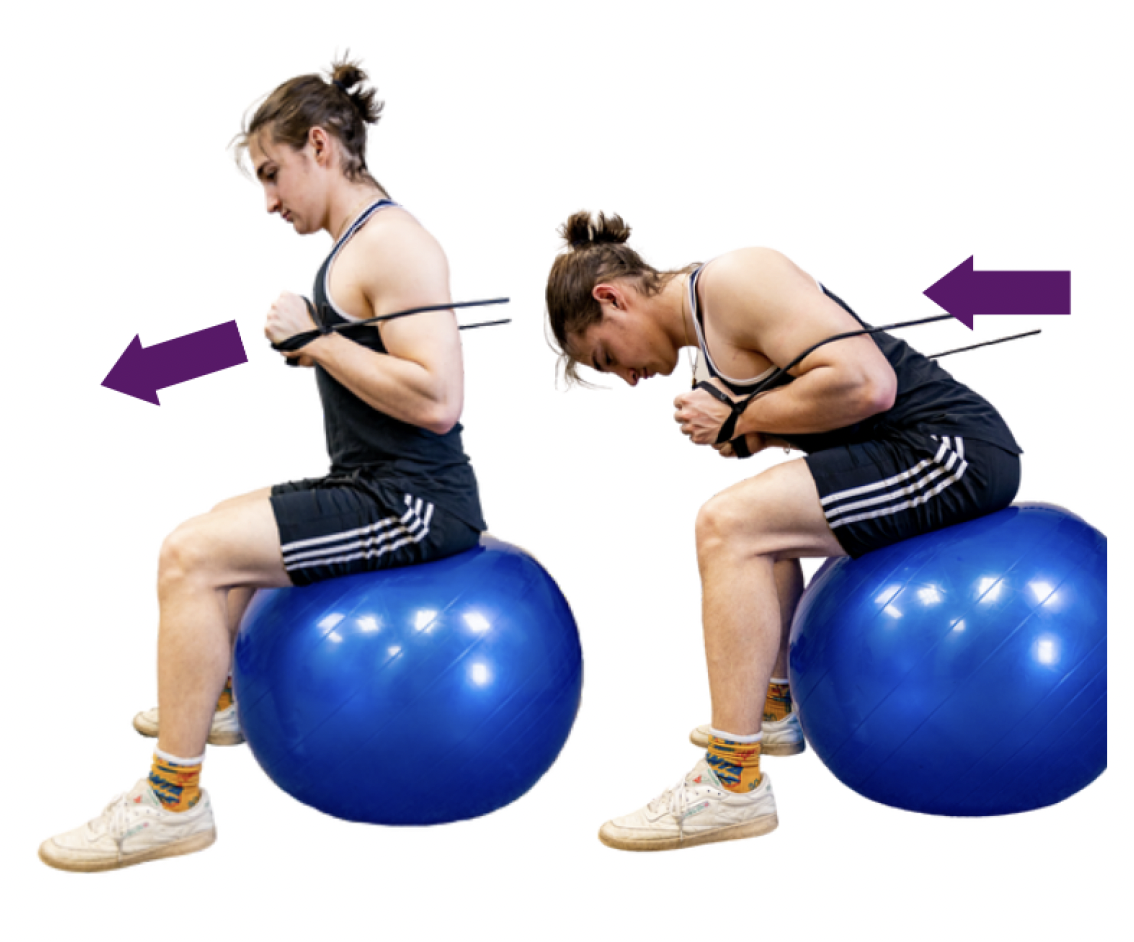
ball seated rotation demonstration

Ball Crunch

This exercise will increase the strength in your core, abdominals, and hip flexors. Sit on the ball as you did in the back extension exercise but facing in the opposite direction.  Pull the bands to your chest in the front to tension the bands and keep them there as you flex your body forward. Slowly control the movement as you come back to the starting position.
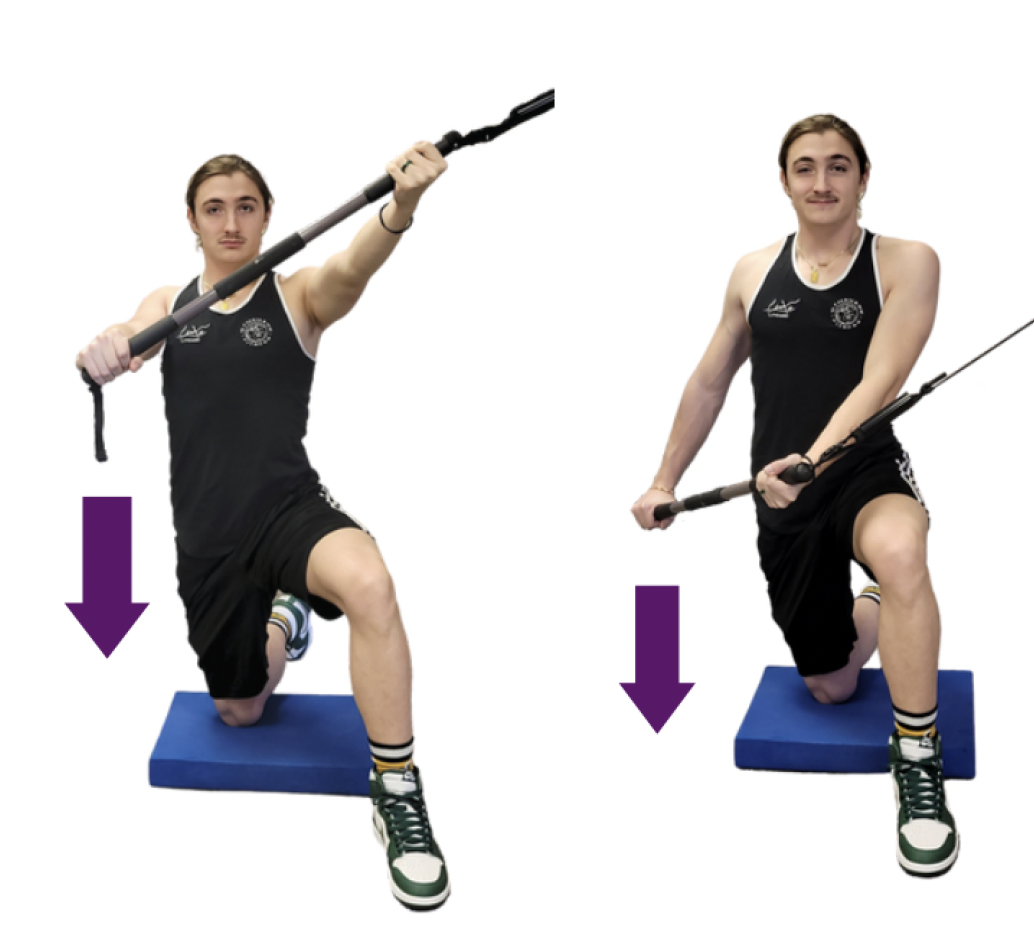
ball crunch demonstration

Half kneeling chop

This exercise will increase the strength in your core as you challenge yourself to maintain the starting position while pulling down and across your body like chopping wood.  You will need a stick or dowel to attach to the end of your band and attach the band slightly above shoulder height.  This exercise works best with tubing and the door anchor.  Start in a half kneeling position and hold the stick or dowel. The band or tubing should be anchored to a door. You can set yourself up with the band to your side or slightly behind you. You should be pulling towards the knee that is down on the ground.  As you pull the band across your body, extend the push with the top hand until it is straight.

half kneeling chop demonstration

Do you prefer a video demonstration of these exercises? Click here to access videos and printable demonstrations.

Once you’ve mastered these exercises, you’ll be on your way to having a stronger back and less back pain.  

When you can easily perform these exercises for 3 sets, you’re ready for the next level of core exercises found here. 

To learn more, sign up for our newsletter, where we share useful tips and information like this!

To download a pdf of this routine, click here.

If you’d like to get out of pain as quickly as possible, you can get an appointment with me by clicking the Request Appointment link on the right-hand side of your screen, or calling (845) 255-1200.  I look forward to meeting you.


Affiliate Links to Recommended Products:

Exercise tubing with handles and door anchor 2-20 lbs  – https://amzn.to/3Ew1Cfr

Exercise tubing with handles and door anchor 10-50 bs – https://amzn.to/3sMqBUiZ 

Balance pad – https://amzn.to/3LrBVwJ 

Physioball – https://amzn.to/3CpKHbZ

To see additional recommended items, please visit this link.

To read about other recommended exercises to improve core strength, visit my blog.

Muscle of the Month – The Hamstrings

Hello and welcome to May’s Muscle of the Month! It’s warm and wonderful outside. Running, hiking, and walking in the beautiful weather is a welcome change from those dark winter months that never seemed to end. So while you’re out there, don’t forget to stretch – especially your hamstrings.

Hamstring

What’s a hamstring?

“Hamstrings” is a term most people use to refer to the muscles on the backs of their legs, but there are three separate muscles in that area: semitendinosus, semimembranosus, and biceps femoris. All three muscles bend the knee and extend the hip because all three muscles cross the hip and knee joints (apart from the short head of the biceps femoris which only bends the knee because it only crosses the knee joint).

How to locate the hamstrings:

The hamstring muscles (semitendinosus, semimembranosus, and long head of the biceps femoris) start on your sits bones (ischial tuberosities) and go down the leg to the back of the knee. The semitendinosus and semimembranosus on the inside of your thigh, and the biceps femoris on the outside of your thigh. If you bend your knee, you can feel strong tendons right above your knee where your hamstrings end.

What do the hamstrings do?:

Bending the knee and extending the hip are key motions in running, walking, climbing and virtually all other forms of locomotion. Winding up for a kick or jump will also engage the hamstrings.

Common pains and problems with hamstrings:

Hamstring TP

When your hamstring is cramped, torn, painful or “acting up,” you feel it. It’s a very big group of muscles. We’ve all had those moments when we spend the better part of a day with a leg up on a table stretching our poor, neglected hamstrings. But even when you’re not in pain, hamstring tightness is huge in limiting flexibility of the spine and legs. Not being able to touch your toes may not seem like a big deal, but that lack of motion directly effects your low back. Chronically tight hamstrings can flatten the lower back, causing your spine to lose some very important curves. Lack of movement can lead to pain, chronic tightness, bad posture, arthritis, and subluxation. Trigger points can refer pain over a large part of the back of the thigh.

How to stretch the hamstrings:

Hamstring Stretch

Because it’s used nearly all the time that we are moving, the hamstrings need their own dose of TLC and stretching. Stretching the hamstring is easy because it’s such a big muscle. Start by standing. Walk your left foot out about two feet. Straighten your left knee and push your hips back. You should feel a deep stretch in the back of your left leg. Be careful not to put your hands over your left knee. You can put your hands on your thigh or your calf, but never apply pressure on an extended joint as it can cause damage to that joint. Hold the stretch for 30 seconds and switch legs. Repeat three times for a thorough stretch.

Injuries to the hamstrings can be relieved with active release technique, chiropractic, acupuncture, massage, physical therapy, and other bodywork techniques.   For increased flexibility of the hamstrings try Yoga, Tai Chi, Karate or other martial arts.

Be sure to visit Performance Sports and Wellness for a full evaluation of your hamstring pain or tightness and to ask any questions you may have.

Don’t have any hamstring pain to complain of? Great! Send this article to someone you know who does.

About Dr. Swann: Dr. Casey Swann graduated from Southern California University of Health Sciences with her Doctorate of Chiropractic in spring 2012. She is full body certified in Active Release Technique and holds certifications in Graston Technique, Cox Technique and Kinesiotaping.  She practices at Performance Sports and Wellness with Dr. David Ness in New Paltz & Poughkeepsie.

References:

picture 1: www.athleticquickness.com

picture 2: www.triggerpoints.net

picture 3: www.teachpe.com

Track & Field Injuries in adolescents

As the Track and Field season kicks into high gear we are seeing more and more lower extremity injuries in our office in high school and college athletes.  Some of the most common injuries we are seeing are shin splints, plantar fasciitis, knee pain, ITB Syndrome, runners knee, and hip pain.  The most common cause of adolescent running injuries are; over training, poor bio-mechanics  lower crossed syndrome, incorrect footwear, lack of core strength and stability.  All of the above conditions if left untreated can lead to stress fractures anywhere from the spine down to the foot.

The body is a machine and it is designed to work synchronously when running is involved.  Normally the knees line up under the hips and above the ankle or foot.  There can be slight variations between boys and girls with girls being more prone to a little more angle at the knee due to the shape of the female pelvic bones.  When things don’t line up right and your running track & field, stress gets placed on different parts of the body that over time with the volume and intensity of track will lead to any of the above conditions.  Another cause of improper stability is a lack of core stabilization.  Today’s children’s posture is so poor that they have no core stabilization or flexibility, which when you are a track and field athlete is a recipe for injury.

How do you know the difference between muscle strain and injury?  Most injuries begin with some muscle pain or joint pain.  Normal aches and pains can be expected in the beginning of the season and after intense track workouts.  Pain that doesn’t go away after 2-3 days should be considered abnormal.  If a child continues to run with pain compensations happen throughout the body that can worsen the current injury or create a new one.

Below is a brief description of some of the conditions we see in our office, and in the Vassar College Athletic department where I have just finished my third season as the chiropractor and Active Release Techniques provider.

Plantar Fasciitis: pain  and swelling in the arch of the foot.  Cause: improper arch support, foot weakness.

Shin Splints: pain anywhere along the shin bone. Cause; stress reaction in the bone from overuse,  improper bio-mechanics

Achilles Pain:: pain in the tendon above the ankle.  Cause:  Tight calves and foot muscles, overuse, bio-mechanics

ITB Syndrome/ Runners Knee/ Patella Femoral Tracking Disorder: pain in the knee.  Cause: Bio-mechanics, lack of stability and overuse.

Piriformis Syndrome / Hip pain: Cause: Bio-mechanics, lack of stability,  and overuse.

Stress Fractures: stress fractures can occur anywhere in bones from the foot to the hip.  The most common are stress fractures of the foot,  followed by the lower leg, hip, pelvis, and spine.  Most stress fractures will prevent an athlete from running normally and will present with acute pain with running.  In the past few years we have seen more stress fractures in the femur and sacrum which mimic lower back pain.

The bottom line is that track & field is a highly intense and repetitive motion sport.  If your child is not bio-mechanically sound or is beginning to experience pain in their bodies they should be checked out by a sports medicine professional. In our office we use slow motion video gait analysis, and functional movement assessment to determine the underlying causes of most running injuries.   Most of the injuries when caught early can be corrected allowing the athlete to continue to participate in their sport.  If you wait too long to have something looked at, and your child is unable to run without pain, the injury  may lead to the athlete being shut down for a period of time for the injured area to heal,  and for the underlying problem to be identified and corrected.  Injuries that keep reoccurring are a sign that the real problem has not been identified or the proper treatment hasn’t been received.  A proper diagnosis needs to be found so the proper treatment and rehab program can be administered.  In our office we use ART to treat most soft tissue injuries, and corrective exercise prescription to address bio-mechanical deficiencies.  Most of our patients recover within weeks instead of months because of the speed in which ART treatment works, sometimes within 4-6 treatments over a few weeks.

Dr. Ness has been in private practice since 1988 with offices in New Paltz and Poughkeepsie.  He is the official chiropractor and Active Release Techniques provider for the Vassar College Athletic Dept, and the Hudson Valley  Triathlon club.  He has cared for hundreds of injured runners and triathletes from pro’s and elite age groupers to weekend warriors and beginners.  If your child has pain or an injury that hasn’t responded to treatment call us today at 845-255-1200,  or you can email Dr. Ness by filling out our contact form.


ART techniques is the cover story in Training & Conditioning magazine

ART techniques is the cover story in Training & Conditioning magazine

ART Magazine Cover 2013

This is an article about the head Athletic Trainer for Syracuse University who is a Physical Therapist and ART practitioner.  As I finish my 3rd year as the Chiropractor and ART provider for Vassar College I can testify how ART is great for sports injury rehab.  As well, ART techniques when combined with pre or in season functional movement assessments can be used to improve athlete bio-mechanics, reduce injuries, and improve athletic performance.  Enjoy!

Dr. Ness a Tier 1 Advantage provider for Optum Healthcare Solutions.

After a review of the annual clinical performance evaluation for patients treated by Dr. David Ness in 2012  Dr. Ness has been given Tier 1 advantage status for OptumHealth Care Solutions for the 2nd year in a row.  Due to continued excellence in his treatment outcomes using sports chiropractic care, Active Release Techniques, custom exercise programs, and stretching Dr. Ness’s treatment results in quicker healing with lasting results.   Tier 1 providers have no clinical submission requirements for the patient or doctor, no authorizations, or pre- authorizations for treatments, streamlining care for our patients.  OptumHealth Care Solutions administers chiropractic & physical therapy benefits for United Healthcare, Aetna, Oxford, and Managed Physical Network.

Race coverage for the upcoming Triathlon / Duathlon Season

Dr. David Ness and Dr. Casey Swann of Performance Sports and Wellness will be providing Active Release Techniques Performance care at the following races this season.

Spring Dual against Cystic Fibrosis April 27th New Paltz
NYTC Trooper Biathlon May 5th West Hurley 10-11am
American Zofingen 5/19 1-5pm  Mohonk Preserve
NYTC Pawling NY 6/1 10-11am
HVTC Race 1  6/12 6:45-8 Woodstock
HVTC Race 2 7/10 6:45 – 8 Woodstock
Ironman Lake Placid  7/18-7/20
HVTC Race 3 8/14 6:45 – 8 Woodstock
Survival of the Shawangunks TRI 9/8 New Paltz 11:30-2:30
HVTC Race 4 9/11 6:45 – 8 Woodstock


Muscle of the Month – Glut Maximus

Hello and welcome to April’s edition of Muscle of the Month!

By: Dr. Casey Swann

This month, I’d like to talk about gluteus maximus. While the glute max is often the butt of many jokes, this is a muscle that demands respect. Located superficially, the glute max begins at the end of the iliac crest and attaches down the sacrum to the coccyx. The muscle then stretches outwards and downwards and inserts into two places: its own bony protuberance on the femur (gluteal tuberosity) and iliotibial band (IT band). (picture obtained from Grey’s Anatomy)

Image

When gluteus maximus is performing correctly, it extends the thigh, rotates the hip outwards or inwards, brings the hip up or down, braces the leg when the knee is straight, draws the pelvis backward and assists our bodies in standing up straight. Having a healthy, fully functional glute max is very important to proper biomechanics and posture.

Image

(picture obtained from www.studyblue.com)

Finding your gluteus maximus is pretty easy. If you simply put your hand on your own buttocks, you are feeling your gluteus maximus. To feel the glute max working, stand on your right leg and put your left leg slightly out in front of you. Now place your hand on your left buttock. Bring your left leg slowly back behind your body. When you’ve brought it back as far as you can and you’re squeezing the leg straight, you should be able to feel your glute max tensed up under your hand.

Lately I’ve been seeing quite a few tight and unhappy gluteus maximus muscles in the office. Glute weakness is very common because we sit on them all day. When you sit, the muscles are stretched, and any muscle stretched all day will become inhibited and weak. Other problems arise from lack of warm up before physical activity, muscle knots and trigger points, inhibited calf muscles, and bad biomechanics of the pelvis.

Image

(picture obtained from www.triggerpoints.net)

Because the gluteus maximus is so big and inserts into so many places, it has ties to many other muscles. At its origin on the iliac crest and sacrum it shares connections to the erector spinae muscles and therefore to low back pain. It inserts onto the thigh bone between the adductor muscles and the biggest quad muscle (vastus lateralis) influencing two of the largest muscles in the thigh. It also becomes part of the IT band which any runner will tell you woeful stories about. The gluteus maximus also lays directly ontop of the piriformis muscle which is a huge aspect of the treatment of sciatica. It’s safe to say the gluteus maximus a very important muscle to consider when treating dysfunction of the thigh muscles, IT band syndrome, low back pain, and sciatica.

Stretching your gluteus maximus is easy. Simply lie on the floor and bring a single knee to your chest. Hold that knee securely with your hands and bring the knee across your chest slightly. You should feel a stretch in your buttock. Also using a foam roller to stretch the glutes can be very helpful.

Strengthening the gluteus maximus is also relatively simple. Lie on your back. Bend your knees and bring your feet close to your seat. Now push your pelvis up to the sky, contracting your buttocks. This is called a bridge-up. Do several repetitions and you will feel your glutes burning. Be sure to keep your neck relaxed.

Image

(picture obtained from www.vivid-host.com)

A very important thing to realize is that if you sit a majority of the day, you need to get up and walk around to avoid over-stretching your glutes.

Other methods of treating dysfunction of the gluteus maximus muscles is active release technique, massage, acupuncture, and physical therapy.

Be sure to visit Performance Sports and Wellness for a full evaluation on your gluteus maximus muscles and to ask any questions you may have.

Don’t have any gluteus maximus problems to complain of? Great! Send this article to someone you know who does.

About Dr. Swann: Dr. Casey Swann graduated from Southern California University of Health Sciences with her Doctorate of Chiropractic in spring 2012. She is full body certified in Active Release Technique and holds certifications in Graston Technique, Cox Technique and Kinesiotaping.  She practices at Performance Sports and Wellness with Dr. David Ness in New Paltz & Poughkeepsie.

Muscle of the month, The Scalenes

Scalenes- Muscle of the Month By: Dr. Casey Swann


Scalenes: A very important muscle in your neck and chest. The scalene muscles are a pair of muscles located in the front of your neck on either side down to your first two ribs. Each side is divided into three separate sections that each do slightly different actions.

Scalene

The anterior and middle scalenes bend the head to the side, flexes the neck forward, and lifts the first rib. The posterior scalene does the same actions except it attaches to the second rib. All three divisions will help you breathe when you need them.

It is good to know how to stretch and loosen your scalenes for a few reasons. Those reasons are called the brachial plexus, the subclavian artery, and breathing.

The brachial plexus is a network of nerves that control your entire arm. The nerves originate from the spine and pass between the anterior and middle scalenes on their way down your arm. Tight scalenes can restrict the movement or impulses down these nerves leading to numbness, tingling, and loss of motor control.

The subclavian artery is the blood vessel that brings blood to the entire arm. The subclavian artery also passes between the middle and anterior scalenes and can be restricted as well. Cold or loss of feeling in the fingers when the arm is raised overhead may mean your scalenes are cutting off the circulation to your arms.

scalene2

The scalenes can also become tight from stress. When we become stressed, we stop breathing from our bellies like we did as babies or when we sleep. Our chest tightens and our ribs stop moving down and out. The scalenes come to the rescue by helping lift our ribs to get more air in our lungs. By doing this chronically, our scalenes become tight and keep our chest lifted permanently leading to a tight, uncomfortable neck and chest.

Take a moment to notice your breathing now. Put one hand on your chest just below your collarbone and the other hand on your belly. Now take a deep breath. How much of that movement in your ribcage came from your chest? How much from your belly? 80% of your movement should have come from your belly and 20% from your upper chest. Did you notice how far up your shoulders went? If you don’t have lungs in your shoulders, why are you using them to breathe?

Another way the scalenes can become tight is from bad posture. Of course, we all assume our posture can be better, and this is probably true. Slumping at our desks or computers will cause upper cross syndrome (shoulders rolled forward, forward head carriage, tight and weak upper back, tight and weak chest). When the scalenes are tight, they flex the head forward, and this is hard on the neck. Just like when you hold a heavy object in your hands, holding that object closer to the body is easier that holding it far away from the body. You head becomes much heavier – about 30 lbs heavier (see image below). Imagine what that does to your spine? This can lead to degeneration in your vertebrae and arthritis in your neck. When the head slips forward, it also changes the orientation of your jaw and can cause headaches, TMJ issues, and neck pain.

Anterior Head Posture

Stretching the scalenes is relatively easy. Start by sitting in a chair. Put your right hand under your bottom and sit on it. This pins the shoulder down so that your neck can stretch without raising the shoulder. Tilt your head directly to the left bringing your left ear towards your left shoulder. If you don’t feel much of a stretch, bring your left hand up to LIGHTLY pull your head down towards the left more. Hold for 10 breaths. Repeat this stretch tilting the head slightly in front of and behind the shoulder as well. This stretch can also be done lying down. See picture below.

Scalene Stretch

Other ways to relax your scalenes include Active Release Technique, massage, acupuncture, postural changes, physical therapy, and heat.

Be sure to visit Performance Sports and Wellness for a full evaluation on your neck and to ask any questions you may have.

Don’t have any neck pain to complain of? Great! Send this article to someone you know who does.

Dr. Casey Swann graduated from Southern California University of Health Sciences with her Doctorate of Chiropractic in spring 2012. She is full body certified in Active Release Technique and holds certifications in Graston Technique, Cox Technique and Kinesiotaping.  She practices at Performance Sports and Wellness with Dr. David Ness in New Paltz & Poughkeepsie.

References:

Picture 1 – Gray’s Anatomy

Picture 2 – Adam, Inc.

Picture 3 (figure 1) – erikdalton.com

Picture 4 – Travel and Simons’ Myofascial Pain and Dysfunction: The Trigger Point Manual

Acupuncture for gymnasts at Ultimate Gymnastics Sunday March 10th 9:30-3:30

Know any gymnasts? Know any athletes? Did you know that Acupuncture is fast and safe for the treatment of athletes aches and pains from training?.  Bill Weinstein of Performance Sports and Wellness will be presenting a introductory priced sports-acupuncture clinic on Sunday, March 10, at Ultimate Gymnastics in Gardiner NY’.   These sessions will be by appointment only, and are meant to introduce acupuncture to the Gymnasts and other Athletes at a reduced fee. Treatment will last 45-60 minutes. The hours are from 9:30 am to 3:30 pm. Here’s a link to Bill’s website: www.mhacu.com/teach & clinics.

Muscle of the Month

Hello, and welcome to another edition of Muscle of the Month! By: Dr. Casey Swann

Image

This is the month of February, and man, is it cold! Shivering always makes my jaw tight, and I’ve noticed I’m not the only one. Let’s talk about my favorite jaw muscle – temporalis (see picture 1).

As you may have guessed, temporalis is named for its place along the side of the head at the temples or temporal bone of the skull. The muscle begins stretched out like a fan around the ear and tapers down to the inside of the jaw right under the cheekbone (or zygomatic arch). The temporalis closes the mouth by bringing the jaw up and back. It is one of the four muscles that allow us to chew. If you lightly place your fingers at your temples and clench your jaw, you will feel the temporalis moving.

The temporalis can become over-used in cases of grinding at night, high stress lifestyles, recent dental work, and chewing too much gum. A tight temporalis can lead to headaches around the temples, popping in the jaw joint, chronic TMJ pain, and facial pain. Trigger points in the temporalis can cause pain in several locations including above the eyebrow, just above the upper teeth, and throughout the cheek (see picture 2).

Image

Stretching the outer temporalis is relatively simple. Close the jaw and place your fingers alongside your head, pointing towards the sky. Place your fingers on your head with some pressure, not inwards, but upwards. Open the jaw slowly. Repeat in any areas of tightness all along the muscle.

It is also possible to stretch the muscle from inside the jaw, however, the angle of one’s own hand makes this very difficult. You may require an experienced hand to do this. Active Release Technique is extremely effective on temporalis muscle tightness. See your local provider.

Other things you can do include simply lying on your back and letting your jaw hang open slowly. Close, and repeat. Rubbing the temples will also help with trigger points. If you chew gum or tend to eat lots of raw, crunchy foods, give your jaw a break and eat softer things. If grinding at night is your major issue, getting a night guard will save your teeth while you work on relieving jaw tension.

Be sure to visit Performance Sports and Wellness for a full evaluation on your jaw and to ask any questions you may have.

Don’t have any jaw pain or headaches to complain of? Great! Send this article to someone you know who does.

Picture 1: Grays Anatomy

Picture 2: Simons, D., Travell, J., Simons, L., 1999. Travell & Simons’ Myofascial Pain and Dysfunction: The Trigger Point Manual, Vol. 1, second ed. Williams & Wilkins, Baltimore.